| |
WAITING FOR THE
SHADOW
SOLAR AND LUNAR ECLIPSE OBSERVING |
|
|
|
|
|
|
|
|
|
MOUNTING A THIN FILM SOLAR FILTER - Joe Cali
|
Introduction This page describes the fabrication of a filter mount from thin film filter material. For general descriptions of types of solar filters and filter safety, there are a number of excellent web resources linked at the end of this article.
There are endless variations on ways of making or mounting a solar filter. The mounting method has to suit the application and the type of filter material.
For any type of solar observing or photography, the filter must be securely attached. During the partial phase of the 2001 total solar eclipse, my solar filter blew off while I was looking through the camera. It was not a pleasant experience. At the same time, the same filter must be able to be quickly and easily removed during the seconds before totality begins without imparting any force to the telescope or camera lens. I have seen eclipse chasers unscrew a filter changing the focus in the process or moving the image out of field while pulling tight caps off the lens. I've used the quick release system described in this article at nine total eclipses and one annular since 2002. It works well and to date I can't fault it. Eye Safety Some materials are rated as safe for visual use, others are rated for photographic use only. Photographic only filters are rated this way because they pass too much ultraviolet or infrared light. Photographic only filters may be used providing you do not look directly through the optical finder. Restrict all focusing and framing to the live view video finder function.
Choice of filter material KODAK ND4 GELATIN Baader Planetarium Astrosolar film ND3.8 (6300 times light reduction) is designed for telescope eyepiece projection photography where effective focal ratios of f15-f40 are typical. The lower density allows for decent shutter speeds at these high f ratios. It is generally unsuitable for prime focus photography. For example, at f8 and ISO100, shutter speed with an ND3.8 is 1/8000s. Baader do not rate this filter material safe for visual use. ND5.0 (100000 times light reduction) gives a respectable exposure 1/500s at f8 ISO 100 and if mounted properly gives nice sharp images. I've heard eclipse observers say that it doesn't have the pleasing orange hue of the polymer filter material. An orange filter can easily be inserted in the optical path or more easliy, an orange or yellow fill layer can be applied to the solar images in Photoshop. If you shoot raw, just use the exposure & colour temperature sliders. Visually, images are very sharp but uncomfortably bright. Black Polymer film sold by Rainbow Symphony, 1000 Oaks and Seymour Solar
This mounting system can be applied to mounting any thin fim material - mylar, polymer or baader. The ND numbers assigned to neutral density filters are the base 10 log of the light reduction factor.
It's important to make a filter mounting that is securely attached. It must not be able to blow off or be knocked off during observing. If you want to use it for total solar eclipse observing, the filter has to be securely attached but at the same time, very easy and quick to remove about just before totality and to replaced just after totality without moving the telescope. The filter design needs to be robust so that it can travel without damage. If you restrict your observing to sunspots, partial and annular eclipses the filter does not need to be so easily removable. Ghost images and internal reflections The metallic reflective types can produce ghost images if the Sun's image bounces off the front element back onto the reflective filter then back down the optical path. One fix is to tilt the mount of the filter so it is not at exact right angles to the optical axis. I have only heard of this, I have not had this problem with my refractors or my camera lenses so my filters are not angled. (Note: To avoid reflections, always use camera lenses without any flat filters screwed into the front). The other fix is to use black polymer with it's low reflectivity. Note that black polymer produces an orange image colouration and is of lower optical quality than Baader film.
Making the filter mount This is a method I've developed for mounting thin film filters. I'm not claiming it's the best in the world but I find it works very well. Tools and materials
Thin film reflective material especially the Baader Astrosolar film must be mounted stress & wrinkle free. I see observers at solar eclipses with filters stretched tight over lens hoods with rubber bands. This degrades the optical image and the filters generally can't be used more than once. Baader gives a detailed explanation of how to make an inexpensive filter on their web site : - I use the method Baader described on that page for stress-free attachment of the filter to the mounting board but I don't like the all in one press-on cap they describe for two reasons. 1. It can't be easily and quickly removed just before totality. When observing a total solar eclipse, typically the filter is removed 15s before the diamond ring appears and replaced 15s after third contact.. So you don't have much of a margin for error. If the cap is tight, there is a chance you might move the telescope as you remove it and miss the diamond ring. 2. The cap type filter has to be transported in a large strong container to prevent damage. This takes up valuable space and weight in your luggage.
I use a two-part filter holder system. A mounting board acts as a flange that attaches securely to the telescope. The filter is separately mounted between a pair of flat boards with a simple yet effective quick release clamp to hold them together.
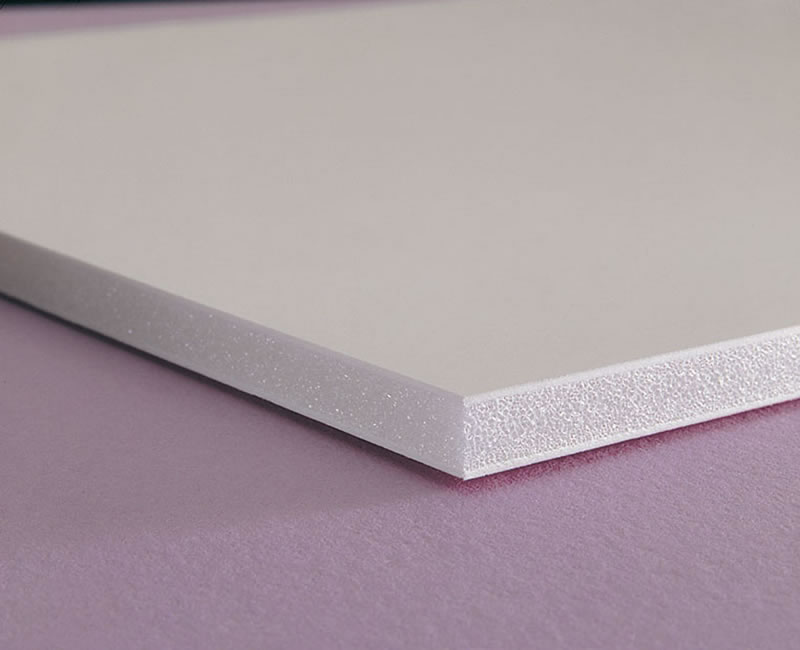
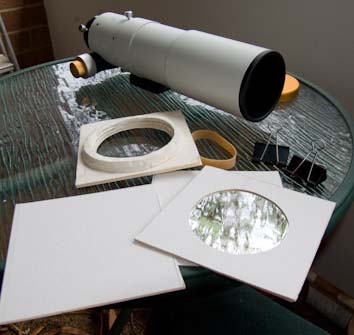
The material I use is called foamboard. Foamcore is one popular brand of this board. It's also known as poster board and by other trade names. It is used by picture framers as backing board when mounting photographs and artworks. I do a lot of picture framing of my own photographs so I always have the material on hand. However, a quick trip to a picture framers or art shop should solve the problem. If you are making filters for small refractors, the framer will probably have scraps that you can get for free.Foam board is a layer of polystyrene foam glued between two layers of thin cardboard. It is light, strong and durable. It is available in 5mm and 10mm thicknesses. I use the 5mm thickness.
1. Cut seven square pieces of foam board, two small and five large. For telescopes up to 110mm diameter make the side of the square of the small pieces 2cm bigger than the diameter of your lens hood. To make a filter for a bigger telescope, it's better to glue two 5mm sheets together to make a 10mm thickness and make the length of the side of the square flange at least 5cm bigger than the telescope tube. This will make the filter flange assembly much more sturdy and robust. I have made a filter for an 8 inch cassegrain using this sandwich construction that is quite robust. The big pieces should be 3cm bigger than the small pieces. So for a 100mm diameter lens hood, the small squares should be 120mm on the side and the big piece 150mm on the side.
 fig 2. The three pieces that make up the flange
Making the lens hood flange 2. Glue the two small pieces together firmly to one large piece using the PVA wood glue. Keep the pieces centred and the glue layer thin but continuous so that when you cut the holes, the layers don't come apart. Clamp well and give plenty of time for the glue to dry. 
3. Trace around your lens hood with a very sharp pencil. Trace carefully so that the trace line is accurate. 
4. Accurately cut through the three layers to put a hole right through the three layers of this piece. This is not easy to do. It is 15mm thick. A razor sharp new scalpel blade or Exacto knife works best. Cut inside the pencil line using vertical cuts to make sure it will be a tight fit when pressed onto the lens hood. If at first it doesn't fit, slowly shave the diameter until it fits or use medium grade sand paper to sand it out.If you do over cut it, that is, make it too big, all is not lost. Later I'll illustrate how you can use a rubber band around the lens hood. In fact I now think this makes for a very firm grip between the flange and the tube, even better than a press fit.
5. When finished, this flange piece will press firmly and securely onto the lens hood of the telescope. If it ends up being loose, place a wide flat rubber band around the lens hood to provide extra grip.
Set the flange aside.
Making the filter mounting board 6. Take two more of the large boards. This time, cut holes that are just slightly smaller (2-3mm) than the lens hood in two boards. Make sure these holes line up with the hole in the piece you've just made.
7. Cut a square piece of filter material. The length of the side is the diameter of the hole plus four times the width of your double sided tape. It can be difficult to position the board exactly over the hole in the next step (8). You need to put some positioning marks on the filter using the fine tip marker pen. Place the square piece with the hole on the bench. centre the filter over the hole. Take one of the uncut squares and lay over the top being careful not to move the filter as you do this. Carefully pick it up and clamp the two boards together with your fingers. Invert the whole thing. You can now carefully mark the circumference of the filter with the marker pen. Use these marks in step 8 to position the filter. You dont need to mark the whiole circumference, three marks at 120 degree spacings are enough.
8. Place thin double sided tape around the edge of the hole.If you have sized the boards and filter correctly, there should be enough left around the edge for another run of double sided tape all around. This will be used to bond the other piece of foam board to this one. Peel off the non-stick coating
Tape a soft tissue to a flat surface. Place a piece of the Baader Astrofilm or other thin film filter on the tissue. With the double sided tape facing down, press it firmly against the Baader film using the pen marks to position the hole centrally over the film. 
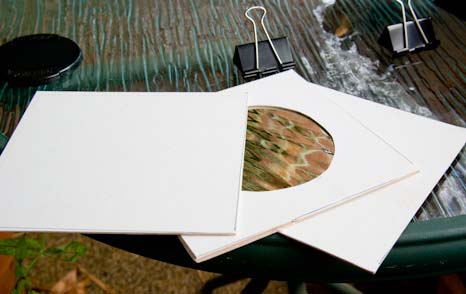
9. The solar film should be firmly bonded to the foamboard and free of wrinkles. 
10. Place double sided tape around the very outer edges of the board and bond it to the other piece that has the matching hole. You now have a fliter sandwiched between two pieces of foamboard. The filter material is recessed 5mm from both surfaces so that if you put it down on an uneven surface, it's less prone to get damaged.
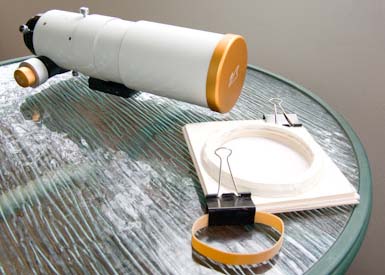
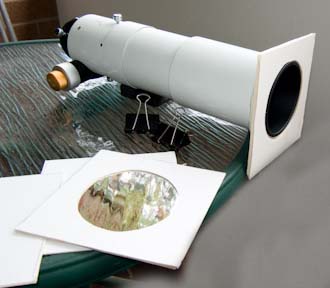
Safe Storage and Transport 11. Use the two plain boards you set aside earlier and place them either side of the filter board. Add the flangepiece to one side.. Hold the whole thing together with rubber bands. This is how you will transport it. It is quite robust, you can put it in a suitcase just like this as long as it is near clothes and isn't where heavy metal telescope parts can chew into it. This is very space efficient method as it is only 10mm thicker in one dimension than the filter alone. 
Attaching and using the filter 12. Press the flangepiece onto your telescope lenshood. If it is loose, you can put a broad rubber band around the lenshood to increase the diameter a little. This actually provides a lot more grip for the mounting flange than just pressing a tightly fitted flange directly over the lens hood. Take the protective boards off the filter piece.
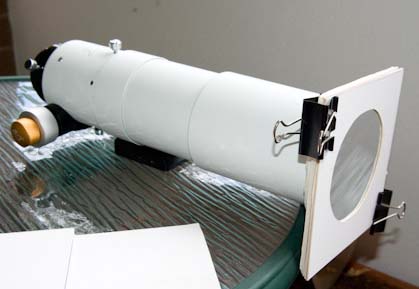
13. Use four large spring steel paper clips, the type used to hold 20mm thick bundles of paper together in an office. Four clips will keep stray light from filtering through the gaps.
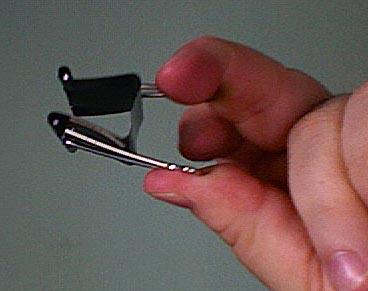 ................ ................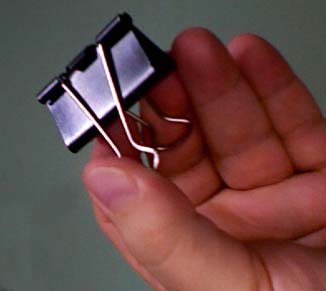
14. If you are observing a total eclipse, remove two clips about 2 minutes before totality. Stray light won't be a problem at that stage.
15. About fifteen seconds before totality, remove the filter. I usually just clip the filter to the lensboard. If placed on the ground, there is always a chance that it will get stepped on or damaged.
16. After the end of totality, return the filter to the covering position.
  .......... ..........  .......... ..........  .......... ..........
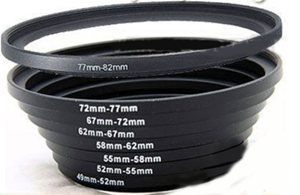
 A universal mount for camera lenses 1. If you want a
unversal mount that will fit any lens, go to EBAY and buy a full set of
step up rings. They'll cost you around $10-$15.
There are a couple of traps in this step. Make sure you buy step UP rings. I occasionally see some cheap resellers call step down rings step up rings. If you find one of these ditch them and find a seller who is really clear. 2. The
biggest ring gets glued to the flange so your biggest size is the
second filter size in the series. Many of these nests of rings go
from 49-77mm. Some do go from 49-82mm. If you buy a 49-77mm nest
and you glue the 77mm to the flange, the biggest available size is
72mm. To work around this in addition to the nest, buy a 77-82mm ring
or make sure you get a 49-82mm set AND also buy a cokin ring, The
cokin ring has a flat front flange that will give you a strong glue
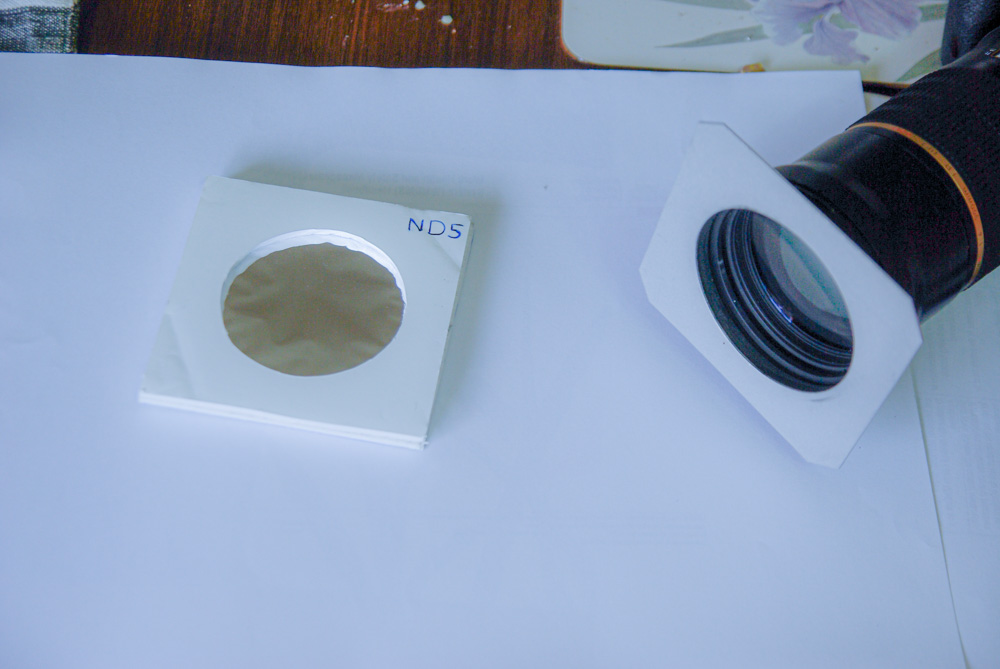
joint. 3. Glue the
82mm Cokin ring to a flat square flange. The flange should have a hole
precut in it. In the illustration, I have used a piece of 1mm
thick aluminium sheet however, a piece of cardboard such as matboard
available from framing shops works just as well. Glue with epoxy
resin. Make a recessed ND5 solar filter holder, as already
described above and the same size as the screw in flange.
4. Screw the flange into the lens filter thread. 5. Use
as many step down adapter rings as necessary to fit your lens.
Making it this way means that if you have a small diameter lens now but
buy a bigger one in years to come, you don't have to keep remaking
flanges.
Using the Cokin ring in the above filter holder plus the nest, you can step down to any camera lens size between 49 and 82mm
During the partial phases, the filter is held securely in place by either metal springback paperclip
Primary exposure recommendations These exposure recommendations are based on my own exposure tests using Kodak ND 4 and Baader Astrosolar Photovisual ND 5.0. There are two tables for each density. The first yields a fairly white Sun. Grey scale value = 80% where 100% is pure white, 50% is middle grey and 0% is black. If you want to digitally colour the Sun, give one stop less exposure. A table of these values has been proovided for convenience. It's always best if you conduct your own exposure tests to be sure that you get the correct settings for you camera sensitivity and telescope f stop & transmission. The Baader Astrosolar Photographic film ND 3.8 is not recommended unless you are using eyepiece projection for high magnification with large effective focal ratios f22-f45.
ND 3.8 is not safe for visual use.The Baader Astrosolar Photographic film ND 3.8 is not recommended unless you are using eyepiece projection for high magnification with large effective focal ratios f22-f45 for photographing sunspots, faculae and transits. even then, electronic focussing (live view) is recommended.
Links Elsewhere on this site Eye safety while watching solar eclipses Eclipse Photography for beginners https://joe-cali.com/eclipses/PLANNING/TSE%202009p/beginner_eclipse_photo.html Atmospheric Extinction Tables for eclipses on or near the horizon https://joe-cali.com/eclipses/ARTICLES/extinction_folder/EXTINCTION.html From the NASA solar eclipse home page and MrEclipse.com Solar Eclipse Eye Safety-Fred Espenak
Solar Eclipse Eye Safety-Ralph
Chou
Safe Eclipse Viewing Techniques-Fred Espenak
Solar Filters - Time for an International
Standard-Ralph Chou
Eclipse Photography-Fred Espenak
From Bill Kramer's eclipse-chasers.com web site Filters Solar Filters
Solar filter suppliers Baader Astrosolar film
Prefabricated black polymer and
mylar filters © 2009 Joseph A. Cali
|
|
|
|
|
|
|
|
|
|
 fig
5. Cutting the hole in the flange using vertical cuts.
fig
5. Cutting the hole in the flange using vertical cuts.